How Snow Forms
Snow in the atmosphere
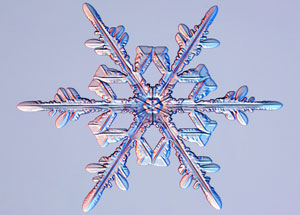
 Once snow crystals form in the atmosphere, they grow by absorbing surrounding water droplets. The snowflakes we end up seeing on the ground are an accumulation of these ice crystals. This magnified image of snow crystals was captured by a low-temperature scanning electron microscope (SEM). The pseudo colors commonly found in SEM images are computer generated, and in this case highlight the different flake formations.
—Credit: Agricultural Research Service, United States Department of Agriculture
While it can be too warm to snow, it cannot be too cold to snow. Snow can occur even at incredibly low temperatures as long as there is some source of moisture and some way to lift or cool the air. It is true, however, that most heavy snowfalls occur when there is relatively warm air near the ground—typically -9 degrees Celsius (15 degrees Fahrenheit) or warmer—since warmer air can hold more water vapor.
Because snow formation requires moisture, very cold but very dry areas may rarely receive snow. Antarctica's Dry Valleys, for instance, form the largest ice-free portion of the continent. The Dry Valleys are quite cold but have very low humidity, and strong winds help wick any remaining moisture from the air. As a result, this extremely cold region receives little snow.
Snow on the ground
The character of the snow surface after a snowfall depends on the original form of the crystals and on the weather conditions present when the snow fell. For example, when a snowfall is accompanied by strong winds, the snow crystals are broken into smaller fragments that can become more densely packed. After a snowfall, snow may melt or evaporate, or it may persist for long periods. If snow persists on the ground, the texture, size, and shape of individual grains will change even while the snow temperature remains below freezing, or they may melt and refreeze over time, and will eventually become compressed by subsequent snowfalls.Over the winter season, the snowpack typically accumulates and develops a complex layered structure made up of a variety of snow grains, reflecting the weather and climate conditions prevailing at the time of deposition as well as changes within the snow cover over time.
How big can snowflakes get?
Snowflakes are accumulations of many snow crystals. Most snowflakes are less than 1.3 centimeters (0.5 inches) across. Under certain conditions, usually requiring near-freezing temperatures, light winds, and unstable atmospheric conditions, much larger and irregular flakes can form, nearing 5 centimeters (2 inches) across. No routine measure of snowflake dimensions are taken, so the exact size is not known.XXX . V How does snow form?

Snow is formed when temperatures are low and there is moisture in the atmosphere in the form of tiny ice crystals.
When these tiny ice crystals collide they stick together in clouds to become snowflakes.If enough ice crystals stick together, they'll become heavy enough to fall to the ground.
How cold does it have to be to snow?
Precipitation falls as snow when the air temperature is below 2 °C. It is a myth that it needs to be below zero to snow. In fact, in this country, the heaviest snow falls tend to occur when the air temperature is between zero and 2 °C. The falling snow does begin to melt as soon as the temperature rises above freezing, but as the melting process begins, the air around the snowflake is cooled.If the temperature is warmer than 2 °C then the snowflake will melt and fall as sleet rather than snow, and if it's warmer still, it will be rain.
'Wet' snow vs. 'dry' snow
The size and make up of a snowflake depends on how many ice crystals group together and this will be determined by air temperatures. Snowflakes that fall through dry, cool air will be small, powdery snowflakes that don't stick together. This 'dry' snow is ideal for snow sports but is more likely to drift in windy weather.When the temperature is slightly warmer than 0 °C, the snowflakes will melt around the edges and stick together to become big, heavy flakes. This creates 'wet' snow which sticks together easily and is good for making snow men.
Snowflakes
Snowflakes are collections of ice crystals that can occur in an infinite variety of shapes and forms - including prisms, hexagonal plates or stars. Every snowflake is unique, but because they join together in a hexagonal structure they always have six sides.At very low temperatures snowflakes are small and their structure is simple. At higher temperatures the individual flakes may be composed of a very large number of ice crystals - making a complex star shape - and can have a diameter of several inches.
XXX . V0 How Snow Makers Work

How Nature Makes Snow
One common notion is that machine-made snow is artificial. This is not really the case -- it's actually the same stuff that falls out of the sky, it's just created by a machine rather than by weather conditions. The machine works very differently than a weather system, but it accomplishes exactly the same thing. To understand how machines make snow, it's a good idea to first look at how snow occurs naturally.
Snow comes from water vapor in the atmosphere. Clouds form when the water vapor (water in gas form) in the atmosphere cools to the point that it condenses -- that is, changes from a gas into a liquid or solid. The droplets in a cloud are so light that the air in the atmosphere keeps them aloft. If the droplets get too heavy, they fall in the form of precipitation. If it is cold enough, this water vapor doesn't condense as liquid water droplets, but instead as tiny ice crystals. In most parts of the world, rain generally starts out as snow but melts as it falls through the atmosphere (it is very cold at cloud level, even in the summertime).
Snow comes from water vapor in the atmosphere. Clouds form when the water vapor (water in gas form) in the atmosphere cools to the point that it condenses -- that is, changes from a gas into a liquid or solid. The droplets in a cloud are so light that the air in the atmosphere keeps them aloft. If the droplets get too heavy, they fall in the form of precipitation. If it is cold enough, this water vapor doesn't condense as liquid water droplets, but instead as tiny ice crystals. In most parts of the world, rain generally starts out as snow but melts as it falls through the atmosphere (it is very cold at cloud level, even in the summertime).
Manmade Snow

It helps the process along if you mix a nucleator of some sort into the water supply. The water will already contain lots of stuff that can act as nucleators, but increasing the count is a good idea because it ensures that more water droplets will freeze before they reach the ground. One of the most widely used nucleators is a natural protein called Snowmax that is especially good at attracting water molecules.
Snow-Making Conditions

A snow-maker checks out an air snow gun at Wintergreen Resort in Virginia.
Photo courtesy Wintergreen Resort, Wintergreen Virginia
So how do snow-makers determine if the conditions are right? It turns out they need a lot more information than they can get from an ordinary thermometer. Standard thermometers measure the dry bulb temperature of the atmosphere; but the most important factor for snow conditions is the wet bulb temperature.
Getting the Perfect Mix

There are all different kinds of snow. The main difference between snow types is how much water a certain volume of snow holds. Snow-makers often talk about dry snow and wet snow. Dry snow has a relatively low amount of water, so it is very light and powdery. This type of snow is excellent for skiing because skis glide over it easily without getting stuck in wet slush.
Other Uses of Manmade Snow
The most widespread market for snow-making machines is the ski resort industry. But manmade snow has a number of other uses as well. For example, snow-making machines have played a big part in many movie productions. Movie producers often take several months to shoot scenes that take place in the span of a few days. If the movie takes place in a snowy setting, the set decorators have to get the right amount of snow for each day of shooting. Depending on the weather, this could mean melting natural snow or adding manmade snow.
Snowmaking plays a part in agriculture as well. A good coating of snow keeps a lot of the earth's heat from escaping into the atmosphere, so farmers often use it as an insulator for winter crops. The insulation effect keeps the crops from freezing, even when the temperature drops well below 32 degrees Fahrenheit (0 C).
Snowmaking plays a part in agriculture as well. A good coating of snow keeps a lot of the earth's heat from escaping into the atmosphere, so farmers often use it as an insulator for winter crops. The insulation effect keeps the crops from freezing, even when the temperature drops well below 32 degrees Fahrenheit (0 C).
Costs of Snow-Making

Air snow guns coat a slope at Wintergreen Resort in Virginia.
Photo courtesy Wintergreen Resort, Wintergreen Virginia
Water is not a huge expense for ski resorts, however; and pumping this much water isn't incredibly bad for the environment. Most resorts pump water from one or more reservoirs located in low-lying areas. The run-off water from the slopes feeds back into these reservoirs, so the resort can actually use the same water over and over again. Moving this water around can have some negative
XXX . V00 How does snow form inside clouds?
Snowflakes are born inside clouds at high elevations, where temperatures plunge to well below the freezing point of water. Silicate materials – clay minerals and micas – can act as the core of a fledgling snow crystal.
Water molecules join together in a rigid pattern – a tiny ice structure that’s the heart of a snow crystal. The crystal grows by continuing to collect water vapor, and by the attachment of water droplets to its surface.
As it grows, it gets heavier. It starts falling through the cloud. On its way down, it encounters millions more drops of water. The ice crystal gets bigger as the droplets in the cloud give their water to it. All over the cloud, the number of ice crystals multiplies – and soon the whole cloud might be ice. If the flakes of ice get heavy enough, they might fall out of the cloud, drift down to Earth, and blanket the ground as snow.
XXX . V000 How do snowflakes get their shape?
Depending on the temperature and humidity of the air where the snowflakes form, the resulting ice crystals will grow into a myriad of different shapes
The shape of snowflakes is influenced by the temperature and humidity of the atmosphere.
Snowflakes form in the atmosphere when cold water droplets freeze onto dust particles. Depending on the temperature and humidity of the air where the snowflakes form, the resulting ice crystals will grow into a myriad of different shapes.
Snowflakes form in the atmosphere when cold water droplets freeze onto dust particles. Depending on the temperature and humidity of the air where the snowflakes form, the resulting ice crystals will grow into a myriad of different shapes.
Wilson Bentley (1865 – 1931) from Jericho, Vermont was the first person to capture photographs of snowflakes through the use of a microscope attached to a camera. His collection of 5,000 snowflake images introduced many people to the astounding diversity of snow crystals.

Wilson Bentley photographing snowflakes. Image Credit: Snowflake Bentley Exhibit.
In 1951, scientists from an organization now called the International Association of Cyrospheric Sciences (IACS) devised a classification system that characterized snowflakes into ten basic shapes. These shapes include the stellar crystals that many people are familiar with and odd snowflake forms such as capped columns. The IACS classification system is still in use today although there are other more complex classification systems as well.

Classification of snow crystals in 1951 by the International Association of Cryospheric Sciences. Image Credit: Vincent J. Schaefer.
Kenneth Libbrecht, Professor of Physics at the California Institute of Technology, has made extensive observations of how water molecules get incorporated into snow crystals. In his research, he has observed that the most intricate snowflake patterns are formed when there is moisture in the air. Snowflakes produced in drier conditions tend to have simpler shapes.

Effects of temperature and humidity on snowflake formation. Image Credit: Kenneth Libbrecht.
Temperature also has a large effect on the formation of snowflakes according to Libbrecht’s research. Snowflakes formed in temperatures below – 22 degrees Celsius (- 7.6 degrees Fahrenheit) consist primarily of simple crystal plates and columns whereas snowflakes with extensive branching patterns are formed in warmer temperatures.

Photo by EarthSky Facebook friend Paula Lancaster Lupi of a snowflake and frost on her car window.
Bottom line: Temperature and humidity influence snowflake formation. The most intricate snowflake patterns are typically formed during warm and wet conditions.
XXX . V0000 Artificial Snow
Artificial snow is small particles of ice that are used to increase the amount of snow available for winter sports such as skiing or snow boarding. It is produced by a machine that uses a high-pressure pump to spray a mist of water into the cold air. The water droplets subsequently crystallize to form fake snow. The first commercially successful machines were developed in the 1950s and improvements in technology have steadily been introduced. With the increase in the popularity of winter sports, the artificial snow market is expected to show significant growth.
Background
The machines that produce artificial snow are designed to mimic the way that natural snow is made. In nature, snowflakes are formed when the temperature falls below 32° F (0° C). Atmospheric water then condenses on particles in the air and crystallizes. This action produces snowflakes that have a variety of sizes and shapes.
In a snow machine, water is first mixed with a nucleating material. It is then pressurized and forced through an atomizing nozzle. This breaks the water up into a mist, which is then injected with compressed air to break it up even further. As it exits the snow machine, the mist crystallizes on the nucleator and turns into tiny snow-like ice particles. Depending on the quality of the snow machine, the artificial snow can be as good as natural snow.
History
Although archeological evidence suggests that humans first skied about 4,000 years ago, interest in this activity as a sport did not begin until the middle of the nineteenth century. In 1883, the first international competition was held in Norway. The sport soon spread to the rest of Europe and America. As the popularity of skiing increased so did the need for a device that could provide snow when it was not naturally available. This need led to the development of the first artificial snow making machines.
One of the first machines was patented in the early 1900s. While it was functional, this machine was crude and unreliable. Steady improvements in design led to the development of a compressed air snow-making machine in the 1950s. This machine worked by using compressed air to force water through a nozzle. The nozzle would break the water up into smaller droplets, which would subsequently crystallize. The Pierce device, named after its inventor, was effective enough that most ski resorts used it. However, it did have its drawbacks, most notably, the nozzle tended to clog and it required a very high amount compressed air. This made it expensive to run. Additionally, the machine was quite noisy, and the snow that it produced tended to be wetter and icier.
During the 1970s, a variety of new innovations were introduced to the machines that improved the quality and method of producing artificial snow. One improvement was the addition of a rotating base and fan. The fan would blow the newly created snow farther away from the machine than compressed air alone and the rotating base allowed the direction of the snow to be changed. This made it possible to cover a much larger area with a single machine. Another improvement was the introduction of a ducted-fan machine. These machines were portable, making it possible to use them all over the ski run. They were superior to compressed air machines because they were significantly quieter and were less expensive to run.
In 1975, a nucleating agent was discovered by Steve Lindow, a graduate student at the University of Wisconsin. While investigating a method to protect plants from frost damage, he found a protein that attracts water molecules and helps them form crystals. It was soon realized that this would be a useful material for making artificial snow. The material was then trademarked and is now sold under the trade name Snomax.
Raw Materials
Water is the primary ingredient required to make artificial snow. Since ski areas are located on mountains however, finding an appropriate water supply is often a problem. If rivers or creeks are nearby they may be used. Otherwise, ponds or dams are created at the bottom of the mountain to produce a storage supply of water. The water is then pumped to the snow-making machines when needed.
In addition to water, compressed air and a nucleating material are also required to make snow. The compressed air is obtained using a pump. The nucleating agent is a biodegradable protein, which causes water molecules to form crystals at a higher temperature than normal. It is obtained from a nontoxic strain of a bacterium called Pseudomonas syringae. On average, this material can increase the amount of snow produced by a machine by 50%. It also helps produce lighter, drier flakes.
Design
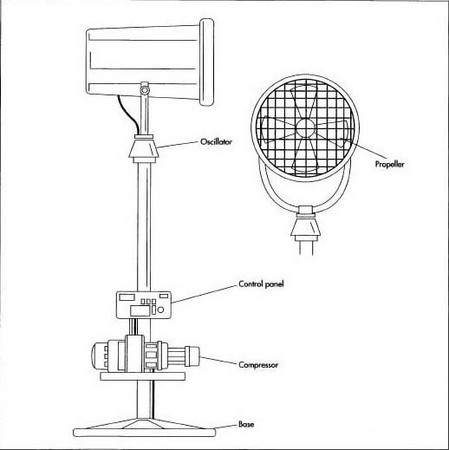
The most important part of any snow-making system is the snow-making machine called a snow cannon or snow gun. A variety of designs are available, however most contain common elements including compressors, pumps, fans, and controls.
A central piece of the snow-making machine is the fan assembly. This part is responsible for converting the air/water mixture into tiny droplets and blowing it out onto the slope. It is similar to a typical portable house fan. It has a rotating propeller blade attached to a variable speed motor. Attached to the blades are curved vanes that direct the flow of air in a linear fashion. The fan is encased in an elongated steel duct that is open on both ends. As the blades of the fan move, air is drawn in from one side of the duct. This side is covered with a screen to prevent foreign objects from entering the assembly. The mechanisms controlling the main ingredients of the snow are located in the front, or discharge end, of the fan duct. This includes a water spray, compressed air pump, and a nucleating device. The nucleating device contains a reservoir filled with a nucleating agent. Water is pumped through this reservoir and the protein is incorporated.
During the snow-making process, the fan assembly is attached to a variety of pieces. To get water and air, hoses are hooked up to the fan assembly. These hoses are connected to a series of compressors and pumps that move air and water through pipes, up the mountain. To increase the coverage of the snow, the fan assembly is mounted on an oscillating stand, or yoke. Depending on the design, the placement of the yoke can be just off the ground or attached to a high tower. Levers may be connected to the yoke, which can adjust the angle at which snow exits the machine. A control box for the machine is typically located at the base of the yoke. This includes switches to operate things such as the water flow, fan rotation, and oscillation speed. The control box may be operated by a remote computer.
The Manufacturing
Process
The production of artificial snow requires a series of devices that can move water and air up the mountain, combine them with a nucleating
A central piece of the snow making machine is the fan assembly. This part is responsible for converting the air/water mixture into tiny droplets and blowing it out onto the slope. It is similar to a typical portable house fan.
Installation of the system
- 1 Artificial snow making requires an entire system to be installed on the mountain slope. This system includes a series of water pipes, electric cables, pumps, and compressors in addition to the snow making machines. First, plans showing the layout of the system are drawn. Then the water pipes and cables are laid in long trenches traversing the entire slope. The trenches must be dug significantly deep so water does not freeze during the winter months. At various points along the water line, valves and hoses are installed to bring water to the surface. Hay bales are placed around them for protection.
Mixing water with other components
- 2 Snow making is typically done at night and requires constant monitoring. It is typically only done when the outdoor temperature is 28° F (-2.2° C) or below. A number of snow machines are hooked up to the water lines all the way up the slope. When the machines are turned on, the snow making process begins. The water is first pumped up the mountain to the various machines. Depending on the type of machine, water may be mixed with the nucleating material prior to pumping or when it first enters the machine.
Creating the snow
- 3 The water is then mixed with compressed air and pumped through a high powered fan. The fan can spray the mixture nearly 60 ft (18.3 m) into the air. As it leaves the machine, the water crystallizes and forms snow. The snow is piled up is large mounds known as whales. At this point the snow may be analyzed and the machines are adjusted to produce the best quality snow.
- 4 When a pile of artificial snow is significantly high, the snow making machine is turned off. At optimal performance, a snow machine can produce enough snow to cover an acre in about 2 hours. The whale is then allowed to set, or cure, for two to three days. This lets excess water drain off and helps produce a softer snow.
Moving the snow
- 5 After the curing process, the snow pile is ready for grooming. Using a special plow, the snow is smoothed out onto the skiing surface. While it is being moved, it is sent through a tilling device. This fluffs up the snow, making it more skiable.
Quality Control
Producing artificial snow that is as good as or better than natural snow requires significant quality control measures. Prior to production, the nucleating material is checked to ensure that it meets the appropriate specifications. While the snow is being made, it is analyzed for crystal quality, appearance, and wetness. The air/water ratio may be adjusted to improve the quality of the snow. If the snow is of the highest quality, it will last longer, hold its shape better, and be easier to groom.
The Future
The shortcomings of the current artificial snow-making technology suggest possible improvements in the future. Currently, the noise generated by these machines is a problem. While attempts have been made to reduce the sound, future machines will be even quieter. Another limitation of the snow-making machines is their narrow temperature range of operation. New machines may be able to produce snow at temperatures over 28° F (-2.2° C). These machines may also produce higher quality snow in less time.
XXX . V00000 compare studying at caterpillar robot
We present a caterpillar robot based on Arduino Uno, remotely controlled through a Play Station 2 wireless controllers.

The result is a miniature version of a true snowplow, caterpillar tracks, with blade and light projector mounted on top to light the way in the dark; everything is controlled by a remote control from the PlayStation 2. Let us see how our caterpillar robot is assembled, starting from the mechanics and then describing the electronics and firmware that is necessary.
Mechanics
On the mechanical side, the robot consists of a snowplow frame that supports a motorized blade (that can be raised and moved) and the traction system: electric motors, wheels and tracks.The frame


Initially it was thought to assemble the entire structure creating an aluminum tubular frame held together by corner brackets, but given the high mechanical stresses and the robustness required, we decided to use for the base four tubular iron (rectangular section) welded together, thus obtaining a rectangle by 600×375 mm.

As a base for the various mechanical components, we used an aluminum plate 3 mm thick 600×375 fixed on the iron frame. Two aluminum profiles vertically mounted (30×30 mm section and 190 mm length), plus two horizontal (30x30x580 mm long side) and two more (30x30x375 mm short side) were used as a skeleton on which we will apply the outer cover of the robot (made using 5 panels aluminum 3 mm thick); to fix the struts to the base, we must practice a hole in their section (8MA), then threaded. Two “L” aluminum brackets shall be fixed always on the front of the frame, and serve as a support for the two linear actuators that allow the blade to rotate right and left.

The traction system
The movement of the snowplow is granted by four trolley wheels, fitted with tires and hub provided with ball bearing with a hole of 16 mm diameter; each wheel has an outer diameter of 26 cm and about 8.5 cm wide tire. Easily available in many DIY centers, these wheels are capable of bearing (individually) a weight of 150 kg, for a total of 600 kg, much more than what we need for our robot. For the wheels axles we have used 16 mm diameter threaded bars, 63 cm long, passed through the aluminum supports and there blocked, caring that those rods protrude equally on each side. The supports are fixed to the lower base of robot’s frame.
To lock the wheels at the right distance (the side facing the support) you can opt for two solutions; nut and locknut, or, as in our case, directly weld a nut on the threaded bar. For this solution, once that is done you need to put a nut (16 MA) in threaded rod, screw it until it get to about 7 cm from the support bar, check precisely the measure and then weld it. The same applies to the other side and the other bar.

To mount the gear on each wheel, you have to remove the four original bolts and derive four holes of equal diameter, matching those of the respective wheel; to position the holes with precision it is convenient to create a cardboard template matching the distance between the holes on the wheels.

Drill the gears and then put the four 8MA 100 mm long in and screw a nut lock to secure the bolt to the wheel rim; then put another nut (or nut and lock nut) at a distance of about 72 mm from the nut screwed into the inner side of the rim. Now you can apply the worm wheel, centering the respective holes and screw tight with four nuts. Having done this, you can mount the wheel: if everything is correct, you will have the nuts of the gear at a maximum distance of 10 mm from the frame.

On each axle, you must enter the lock nuts 16 MA. Externally, the two wheels are spaced and held in tension by an angular bar of aluminum 30×30 mm, 2 mm thick and should be fixed by a bolt in the center of the threaded bar. When we lowered the blade to shovel we realized that it was necessary to increase adherence using caterpillar tracks (or suitable wheels, such as those of tractors), but we decided to find an alternative solution.

Inspired by the various solutions found on Internet and adapting them to our needs, we have created the tracks by ourselves using four packs of bicycle chains 1/2 “x1/8” with 114 links each (two per side, for a total of 120 links, corresponding to a length of about 166 cm), 40 aluminum corner (mm) 120 12×12 long with a thickness of 2 and 80 5MA bolts 50 mm long and relative nuts. The angular aluminum brackets, spaced 8 cm center to center from a bolt, are needed to hold together and parallel the two chains of each pair constituting a track (wrapped around the relative pair of wheels) and are responsible to obtain the right grip on the snowpack. On each corner, you must drill two holes in which you must insert two bolts 5MA x 50 mm and secure them to the chain, preventing it from slipping to one side or the other.
To match the wheels to the motor pinion MY1016, it was necessary to procure two short pitch chains (like those of electric scooters or mini-motorbikes), to mount two gears of diameter 155 mm to 76 teeth on the driving wheels and space them of about 35 mm from the wheel (the inside of the tire) with 4 bolts 8MA x 100 mm. To fix the engines we used brackets, realized from two rectangular bars of iron (mm) 30×20 375 long and drilled. Starting from the outside, the first hole is approximately at 14 mm, while the second is at 42 mm from the first; this distance corresponds to the holes of the engine (the narrowest part of the motor bracket).

On the bar we drill two holes, at 110 mm from the outside and at both sides, required to fix the two vertical bars 190 mm. The same perforation was made for the second bar. The two vertical bars 19 mm, once welded to the base of the frame, have been drilled at a distance (from the base of the frame) of about 44 mm for the first hole (slot shaped) and 139 mm for the second hole (always slot shaped). At this point all that remains is to fix engines, directing the pinion to the outside and ensuring that it is in line with the gear wheel.
Blade

The most complex mechanical part is the blade support and its mechanism. To make the blade we used a sheet of rectangular steel 650×250 mm, 2 mm thick, which we then slightly curved (above and below, the long side) to facilitate the snow shoveling.
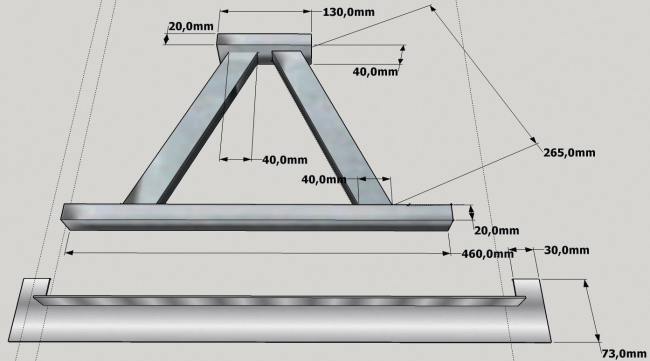
For the mechanical structure that supports the blade and allows it to move, we used:
- a box-shaped iron frame 30×20 mm, 265 mm length, cut off at the end with the required angle
- one iron square rail 40×20 mm 13 cm long
- a rectangular profile 30×20 mm 46 mm long
- an interlocking truss 600 mm long (used for shelves and available in DIY shops), with a bearing support by 16 mm
- two boxes 40×30 mm long 26,5 cm cut end at the demanded angle.

We then made an aluminum rod 11 cm long (12 mm, except in the first 5 mm where it is 14 mm) to be inserted into the 12 mm bearing; in its upper part it has been drilled a 5 mm hole, threaded, to fix by means of a bolt 5MA the bracket for the linear actuator which allows to raise and lower the blade. The second bracket is fixed to the center of the bar with length 265 mm. To rotate the blade to the right and left, we used for each side two L-brackets aluminum 50×50 mm, 40mm width and 5mm thick, drilled and screwed by inserting a washer between the two. A pair of “L-bracket” was fixed, by means of two bolts, in the lower part (left side) of the frame and the other to the right.

The linear actuator is fixed to one end of the L-bracket while the other end was fixed on the triangular structure of the blade, for both sides.
Before drilling and secure the three linear actuators to the blade triangle, you have to take the two linear actuators to move it to right and left, apply 12 VDC to one of the two in order to have the maximum extension, while the other must be fully pulled back. Now you must wire the power supply wires of the two actuators in order to have the positive of the 1st actuator connected with the negative of the 2nd and the negative of the 1st to the positive of the 2nd. Then feed the wired pair of actuators and switch off the tension when they reach the same extension. Now you can attach the brackets of the linear actuator (cod. SUPPLACT) to those of the two side-actuators (on the back).

The bracket must be fixed to the pair of aluminum “L-brackets” (the one with the interposed washer), previously fixed on the front lower frame. Now you can position the part of the actuator arm near the triangle of the blade, fix a small “L” (will serve as the anchor) and take accurate measures before drilling permanently. All that remains is to place also the central actuator, fixing the bracket on the central pivot of the bearing and then securing it (after inserting the specific bracket also on the part of the piston) on the central area of the triangle of the blade.

The interlocking crossbar is fastened to the horizontal bar of the blade triangle, drilled and fastened. The blade steel, properly bended, should be placed on the crossbar to mark the drill holes.
Electronics

- Motor driver;
- relays circuitry RELAY1CH;
- DC/DC converter step up STEPUP30V.
The shield mounted on Arduino are the motor shield to control the three linear motors that manage the movement of the blade and the PS2SHIELD, which allows you to interface with the PlayStation 2 (PS2); the latter requires the RX-PS2, which is a 2.4 GHz radio receiver for sending/receiving specific commands from the aforementioned console.
The wiring diagram of the robot is what you find in these pages; the power source is made by a series of two lead gel batteries by 7.2 Ah: we take the 12 V from the mid-point connection of the two, while between the negative and the positive of the series we take 24 volts. A switch (125V, 2×15 ampere) controls the two supply lines.
With 12 volts, we run Arduino, which will power the shields through its pin-strip; a LED (internally mounting the limiting resistor) will indicate when Arduino is running. The 12 volt directly from the battery stack is also feeding the power section of the motor shield. In fact, since the absorption of the three linear actuators (cod. LACT2) is high, it is not advisable to take the 12 V from Arduino: you opt for the external power supply to be provided to the appropriate PWR terminal. To use the external power supply, you must move the jumper (on the shield) near the terminal, between the central and the EXT. The management of the shield requires a special library for Arduino, supplied with the component. Each linear actuator is composed by a 12 Vdc gear motor using a worm screw to move a shaft back and forth along its length (maximum excursion of 5 cm). The actuator has a dynamic load of 50 kg and a maximum speed of 1.3 cm / s. It is able to support up to about 250 kg, when not moving, and the torque ensures the maintenance of the position of the shaft even in the absence of power. Two limit switches provide the engine to stop when it reaches the maximum extension and contraction, while the diodes allow reverse direction after reaching the limit point. The actuator is made of metal and is sealed to protect it from dust and water (IP63 rated).

Let us now turn to the 24 volts supply line, which is feeding the power part of the snowplow, which are the traction and the projector (optional) sections: the first is based on the motor driver, to be connected with four wires to the same number of Arduino digital lines.
The motor driver is a double bridge power driver capable of driving two brushed motors continuously with a voltage of max 35 VDC and a current of 15 A (each). By interfacing with Arduino and using only four digital I / O (2 PWM), you can choose the rotation direction and speed of the motors. The circuit has four control pins, four LEDs that indicate the rotation direction of motors, two pins for the board power supply (5 Vdc) and two aluminum heat sinks located in the rear of the printed circuit, necessary to dissipate the heat generated during operation at full power. For the management of the driver by Arduino, the manufacturer provides a special library. The output terminal blocks allow you to connect the two engines, to be connected as indicated by the diagram (do not invert polarity, otherwise the tracks will run in reverse!) using cables with a section of at least 1.5 sq. mm.
About control inputs, it should be respected the connection between Arduino and the controller connector pitch 2.54; correspondence that is needed when using the library provided by the manufacturer and our firmware: if you edit them, you have to revise connections. Remember that DIR are the logic levels to set the motors rotation direction and PWM are the PWM signals to command the power drivers.
To identify the controller connector contacts it’s sufficient to refer to the silkscreen visible next to it on the component side of the circuit board.
In addition to the engine controller, the 24 volts will power the section of the LED projector, you can mount or not; if mounted, respected wiring indicated and remember to take the positive 24 V from the relay card (cod. RELAY1CH). The latter houses a relay and the respective drive transistor controlled by Arduino through the Digital I/O 13; Arduino also powers the card, by means of the +5V and ground (GND).

A relay allows turning on and off the projector, targeting action on the corresponding circuit.
The projector is designed to operate at 220 Vac, however, since this voltage is not available on the robot, to avoid using an inverter we modified the projector by opening it, removing the AC / DC and bringing the two wires of the power LED directly to the output of the converter DC / DC (cod. STEPUP30V); the latter is a switching converter with adjustable output voltage, which should be tuned in order to provide to the LED a current such as to make it work at about 10 watts. Usually this is achieved at about 30 volts. However remember that the power is given by the product VxI, (current by voltage, in watts is obtained if V is in volts and I in amperes), then to 30 V, the current consumption should be just under 340 mA. Although the group of LEDs is internally protected from overcurrent, the STEPUP30V has a limitation of the output current to 2A so it can be useful to replace it with a DC / DC equipped with output current limiter; a good example is available on the website www.futurashop.it as STEPUP30VADJ.
Receiving data from the remote control is the job done by the shield PS2SHIELD, for which the manufacturer makes available the specific library. The shield performs the receiving and decoding of the command; the radio part is left to the RX _PS2, which is inserted into the related connector.
The last thing to note is the photoresistor, used by Arduino to detect the ambient lighting and to control the board RELAY1CH so the LED projector is turned on; the component is fed to the voltage divider by a resistor of 10 kOhm (1/4 W) and is read from the analog input A0 Arduino. The 5 volts are taken from Arduino 5V.
This light sensor does a simple thing: in good lighting conditions, the resistance of the photoresistor is low and the voltage read by the ADC of Arduino microcontroller is low and does not trigger the relay board; darkness instead, increases resistance a lot and the ADC reads a voltage close to 5 volts, which causes the projector to switch on.
For the hardware part that’s all: in a coming post episode we will share and explain the Arduino sketches.
XXX . V000000 How to Drive in Winter
Less slipping, less sliding.


Ice and snow can certainly make travel in the wintertime a treacherous experience. So it's important to be armed with helpful information to get you safely through the snow season. We decided to gather advice from the professional drivers from three very different disciplines. From the racing world, we spoke with world record holder, stunt driver and star of Top Gear USA Tanner Foust. Alex Debogorski, fan favorite of the TV show Ice Road Truckers, lent us his wisdom from more than 40 years of over-the-road winter hauling. And to get a perspective from someone who tunes the chassis' of Chrysler's most potent machines, we spoke with Erich Heuschele, manager of SRT vehicle dynamics and 20-year ice racing veteran. Here's what they had to say about winter driving.


it's fifteen below, your car may not start." And all three of our advisors suggest keeping windows clean. "I usually replace my wiper blades every year, and it's right before winter," says Heuschele. Additionally, some of our advisors like using products such as Rainex on their windows and windshield because it helps keep the snow and road grime from building up. Many drivers will forget to clean and remove snow from their headlights and taillights. But cleaning these lamps are more important now than ever. "LED headlights and taillights don't generate the heat of old-school lights," Heuschele says. "So if you're driving a car with LEDs, you must stop periodically and get out and clean them."
Colin Dilley, VP of Technology at Prestone, recommends you check your cooling system before driving in cold weather. Inspect your antifreeze/coolant to make sure it is free of debris and contaminants. If you notice an issue, flush and fill your system with a mixture of 50% concentrated antifreeze and 50% distilled water. If your reservoir is low, top off with with a product like Prestone 50/50 Prediluted Antifreeze/Coolant. Next, using a Prestone antifreeze tester, you can check the concentration and ratio of your antifreeze.


Tidak ada komentar:
Posting Komentar