

XXX . X TOYOTA 12 0 STUDEN LOR

12-Circuit "switched" Fuse Block (Installation W/ Pics) – Toyota pertaining to How To Wire A Fuse Panel .


How to Check Fuses
A fuse is designed to protect more important parts of an electrical system from overheating and related damage. When a potentially dangerous current surge occurs, the wire running through the fuse "blows" and cuts the connection to the circuit. This is great for protecting your car or home electrical system, but inconvenient in the short term. Armed with the right tool and a little knowledge, you'll be able to check your fuses quickly when this happens and find out whether you need a replacement.
Steps
Part 1
Locating the Fuse Box
 1Check your car manual or look in likely places. Many cars have two fuse boxes, and there's no universal standard for where they are placed. You'll save time if you can refer to your car's manual (or find the manual online), look up the location of the fuse that controls the part of the car that lost power, and check it directly. If you don't have the manual, check these common locations for a large box, or a group of exposed fuses:[1]
- Most cars have one or two fuse boxes under the hood, next to the engine or battery. There may also be a fuse box inside the car, so keep looking if the fuse you're looking for isn't here, or if all the fuses here are fine.
- Newer cars often have a fuse box underneath the dash in an easily accessible location. Check the ceiling of the glove box for a hinge that swings downward. You may need a flat-head screwdriver to open the lid.
- Older cars often have their fuses in an open box to the left of the brake pedal or the foot-operated parking brake. It's difficult to examine the fuses closely in some models, so bring a flashlight and/or hand mirror.
- Less commonly, the fuse box is located in the trunk or under the rear seat.[2]
 2Look for indoor fuse boxes. If you are checking the fuses in your home, look for a fuse box or circuit box in closets, basements, laundry rooms, or on the outside wall of the house. If you live in an apartment or shared home, the fuse box may be located in a neighbor's apartment.
 3Check the user's manual for other devices. If you are checking the fuses in a central air conditioning unit or another appliance, check the user manual to find out where they are. For some appliances, you may need to shut off the power to the device before you can safely access the fuse box.


Part 2
Checking Visual Signs
 1Read the labels if present. Car fuse boxes often have a diagram on the outside or inside lid, and always in the car's user manual. This can save you a lot of time, since you can check the one fuse that protects the radio (or other nonfunctional system) instead of all 40+ fuses. Home fuse boxes are often unlabeled, but typically only have a few fuses, so it's easy to test them all
- Find your car's user manual or fuse box diagram online here or with a general online search. You'll need to know the make and model of your car.
 2Leave the fuse connected. Don't remove the fuse yet, as this can be dangerous if the power is still connected, and can cause minor problems to connected systems if you remove a still-functioning fuse. Instead, look closely at each fuse while they are in place.
 3Check for broken wires or scorch marks. A fuse can look completely normal and still be blown (and in need of replacement), but more often than not there will be a visual sign that will guide you to the problem fuse. Fuses come in three basic forms:
- Transparent cylinders (glass or plastic) have a wire running through the middle. If the wire is broken, the fuse is blown. If the whole cylinder is scorched black or brown, the fuse is blown and there may be a major short on the circuit that needs repair (especially if the replacement fuse blows after a short time).
- The two-pronged chip fuses often used in cars have a U-shaped wire running between the prongs, inside the plastic. If the wire is broken, the fuse is blown, but it's often difficult to tell.
- Opaque cylinders (covered by a solid metal coating) must be tested by other means.
- to Check Fuses4Turn off power and remove an indoor fuse. If checking an indoor fuse, you can turn off the main power to the house and remove the fuse to get a closer look. For any type of fuse, if you are still unsure, you can move on to the next section. If you have identified the problem fuse, skip ahead to replacing the fuse.
- This step is not recommended at this stage for car fuses, since removing the wrong fuse can negatively affect idling performance, diagnostic information, or accessories.[3]


Part 3
Testing the Circuit: With a Multimeter
With a Test Light
 1Purchase a modern test light. You can purchase this tool at a hardware store or electronics store. Select a "computer safe" model with an LED light in the handle, or with an incandescent bulb powered by a battery or power outlet. Never test car wiring with an old-style test light with an incandescent bulb that draws power from the circuit, or you could trigger the airbags and cause massive damage.[4]
- Alternatively, if you have a multimeter, skip down to the instructions below to use it instead.
 2Check the fuse with the test light. Follow these steps to check the fuse with a test light:[5]
- Clamp the black grounding lead to an electrically conductive object (such as anything metal).
- Turn the ignition to run, or make sure the main power supply is on if testing a house fuse.
- Touch the red probe near one end of the fuse, then the other. (For small two-pronged fuses, the two prongs are the two ends of the fuse.)
- to Check Fuses3Interpret the results. If the fuse is good, the bulb in the test light will light up both times. If it does not light up on one end, the fuse is blown and needs to be replaced.[6]
- If neither end lights up, there is no current running to the fuse box, or your black lead is not grounded, or the light bulb has burned out. Correct this problem and try again, or use a multimeter instead.


With a Multimeter
- to Check Fuses1Turn off the power and remove the fuse. Turn off the ignition to the car, or the power leading to the home fuse box. Pry the fuse out on one end, then the other. You may need tweezers or needle-nose pliers to remove the fuse, or a similar tool sometimes attached to the lid of automobile fuse boxes.
- If you plan on testing more than one fuse in a car's fuse box, take a photograph first so you know exactly where each fuse goes.
 2Test continuity if available. Most digital multimeters have a continuity setting, which is labeled with a series of parallel arcs: ))). Turn the dial to this setting, then place the two probes at opposite ends of the fuse. If you hear a constant beep while they are touching the fuse, the fuse is still good. If you don't hear anything, the fuse is blown.
- If your multimeter has no continuity option, or you would like to double-check the result, continue on to test resistance.
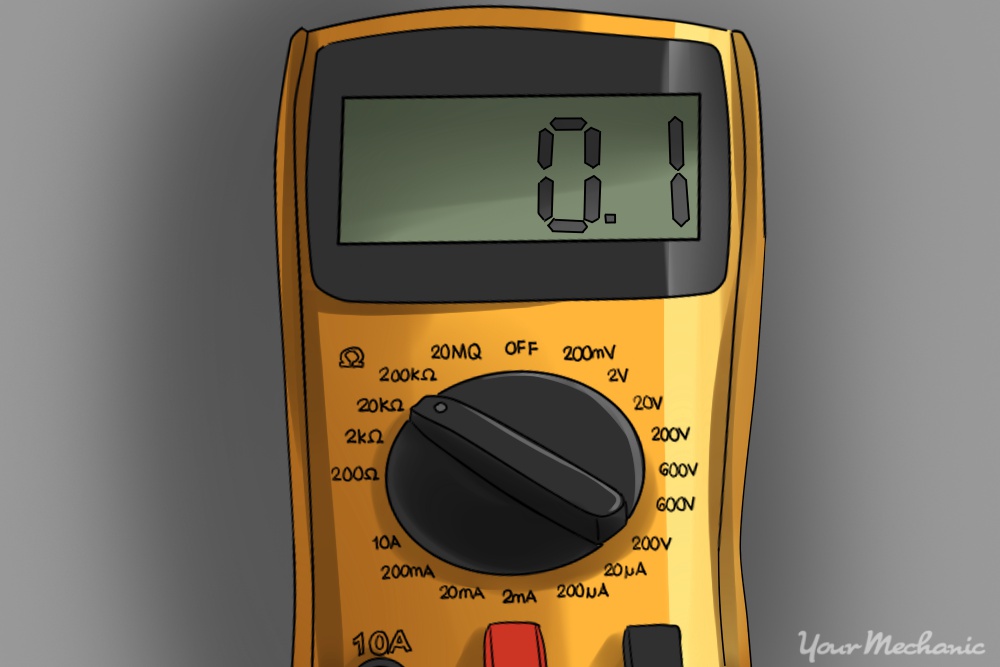
 3Set the multimeter to test resistance. This setting looks like the Greek letter omega: Ω. The resistance setting sends a small current through the fuse, and tests how much current goes through. We don't really care about the exact resistance reading, but if the fuse is blown, we won't get any resistance reading because the current will not be able to pass through the broken wire.
- If you have an analog multimeter, there are multiple Ω settings. Choose the one that says Ωx1.[7] Old models sometimes say Rx1 instead.
 4Touch the two probes to each other. Touch the two metal probes together and look at the multimeter display. This number (or needle position) is what the multimeter currently "thinks" is a resistance of 0. If we get a result near this number when testing the fuse, the fuse is still good.
- Your multimeter probably has a dial (analog multimeters) or a button (digital) that lets you calibrate this back to 0. You can do this if you plan on using the multimeter a lot, but it's not necessary for this task.
- to Check Fuses5Touch the probes to each end of the fuse. Touch one probe to each end of the fuse, while looking at the display. If the display doesn't change when you touch the fuse, the fuse is blown and needs to be replaced. If the number or needle position moves to a similar position to the one you saw when both probes were touching, then the fuse is still good and can be popped back into the fuse box.


Part 4
Replacing a Fuse
- to Check Fuses1Turn off the power and remove the fuse. Whenever you are removing a fuse or putting in a new one, make sure the power supply to the fuse box is off. For a car, this means turning off the ignition.
 2Find a new fuse. These are available at hardware stores, electronic shops, or auto supply stores (for car fuses). Bring along your old, blown fuse so you can compare the size and other characteristics, as described below.
 3Select a new fuse of the same amp rating, type, and shape. Replacing a fuse with the exact same type of fuse is very important. Most importantly, check the amp rating, normally a number written on the fuse, and purchase a replacement fuse with the same rating. Each fuse is designed to blow at a specific number of amps; this is its entire purpose. If you use too low an amp rating, the fuse might blow during normal use and short the circuit. If you use too high an amp rating, the fuse won't blow during a power surge, and the less replaceable parts of the circuit will be damaged instead.
- Transparent, cylindrical fuses come in two types: fast-blow (a straight wire), or slow-blow (a coiled wire). Don't put in a slow-blow unless the old fuse was also a slow-blow, or the fuse may not be able to prevent damage quickly enough.[8]
- to Check FusesPop in the new fuse. Modern fuses should pop in easily with a little pressure. Old, glass fuses sometimes need to have one end pushed in first, then the other.


Use a multimeter. This will also be able to tell you the resistance of the connection, the voltage, and the amount of current. Make sure that the current and voltage is below what the multimeter is rated at a maximum, that it can measure in a variety of metric units, that you attach the alligator clips correctly, and that it can measure alternating current, which is usually what fuses are used for. There are several HVAC (high-voltage alternating current) multimeters available that can satisfy all of these conditions to a certain extent. If the voltage when the fuse is in is equal to or less than when it is out, you will need to replace the fuse. You can usually hear beeping at 0V

XXX . XI How to Fix a Car Horn
You’re on your way to work and all of a sudden - a driver on his cellphone pulls out in front of you. You go to honk your horn but nothing happens. You quickly pull into the opposite lane, barely avoiding a collision. Not having a functional horn could have costed someone’s life.
Typically, the horn circuit consists of the horn, switch, fuse, and relay. Battery voltage is applied through a fuse to the relay winding and contacts. When the horn switch is depressed, the relay is grounded, completing the circuit and blowing the horn. Some vehicles do not use a relay, and voltage is supplied directly through the horn switch to the horn. In this article, we will go over how to test and repair each of these components. Here is how to fix your car horn:
How to Fix Your Car Horn
- Gather the correct materials - To properly fix your car horn, you will need the following: Digital multimeter, Jumper wires (optional), Multimeter, Protective gloves, Quick-disconnect connectors (optional), Repair manuals (optional), Safety glasses, Wire crimping and stripping pliers (optional), and some Wire (optional).

- Locate the fuse box - You first need to test the fuse and relay. The location of the fuse can be found in your owner’s manual. Generally, there is a fuse box on the driver’s side of the dash and one under the hood of the car.
Tip: AutoZone provides free online repair manuals for certain makes and models. You can visit their website to see if a free manual is available for your car.
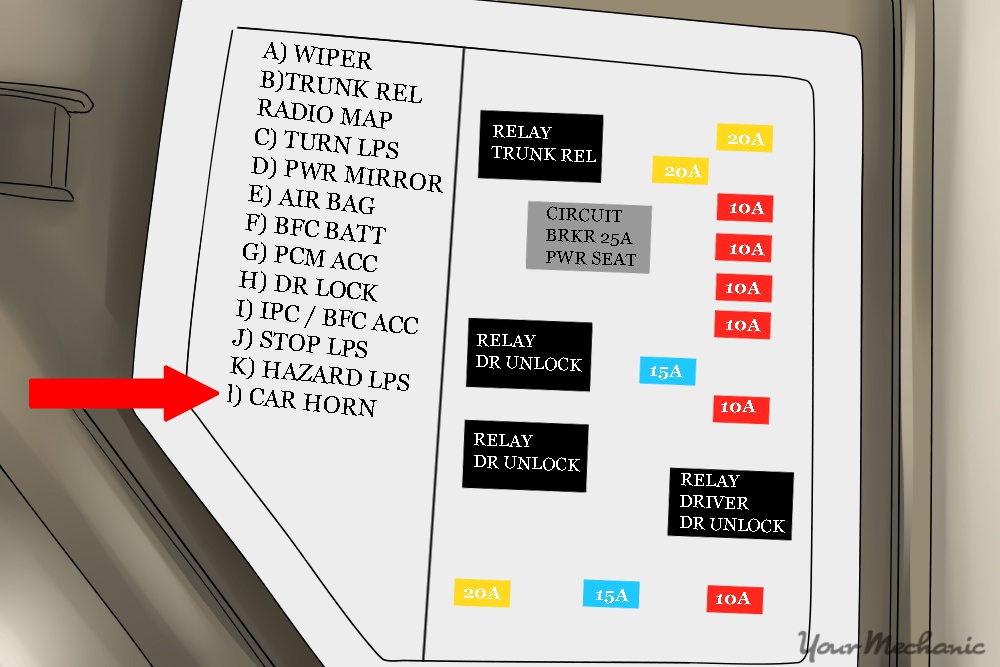
- Find the right fuse - Look at the diagram on the back panel of the fuse box and find the fuse number that corresponds to the horn.
Tip: You can also check your manual to see the fuse diagrams for each of your fuse boxes.

- Remove the fuse - Once you have located the fuse for the horn, pull it out with either your fingers or a pair of fuse pliers.

- Check the fuse - In order to check whether or not the fuse is your problem, you will need to inspect the fuse to see if has blown. If the U-shaped wire is broken, the fuse has blown and will need to be replaced. If the wire inside is not broken, this does not ensure that the fuse is still working.
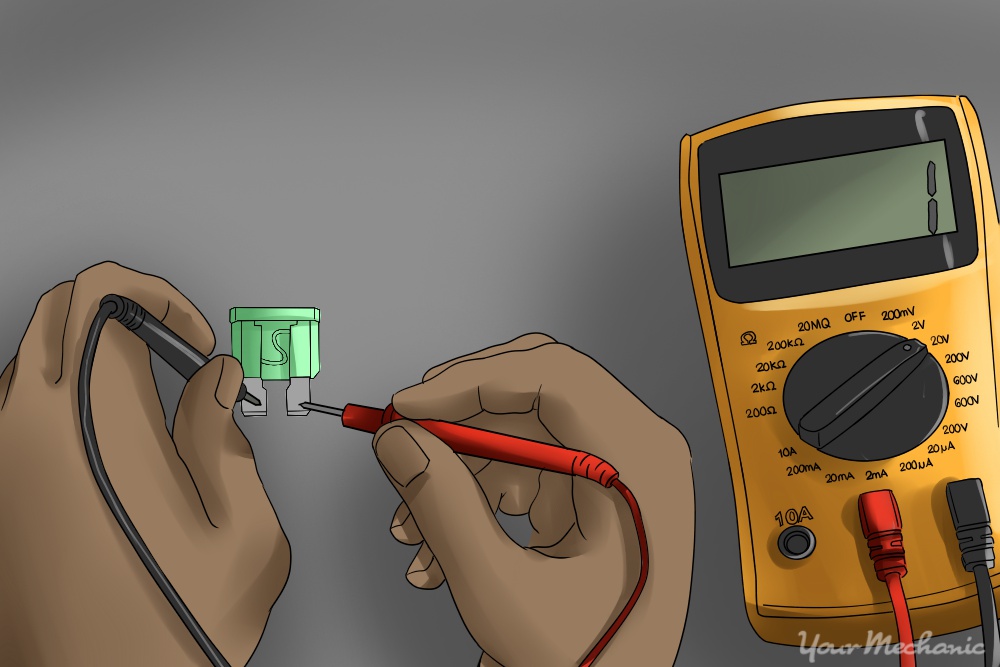
- Test the fuse with a multimeter - Test the fuse with a multimeter. You can do this by turning on the multimeter and touching one meter lead to each of the fuse’s terminals. You should get a numeric reading on the meter screen. If, however, you get a reading of saying “Out of limits (OL)”, there is no continuity and the fuse is blown.

- Install the new fuse - If you find the fuse has failed, install a new one of the same amperage rating. To do this, simply push the fuse back into its correct slot.
Note: Keep in mind, fuses don’t blow for no reason; they blow in order to protect the circuit from excessive current draw. Keep an eye on any new fuses that are installed. If it blows again, you will need to inspect the circuit for faults.

- Locate your relay box - If the fuse checks out OK, the next thing you’ll want to do is check the horn relay. The relay location will be listed in your owner’s manual. Generally, it will be found in the underhood fuse box.

- Test the relay - The easiest way to check for proper relay operation, is to swap the horn relay with another identical relay in the vehicle. Typically, the same relay design will be used on a few different circuits, allowing the relays to be swapped within a car. If the horn functions with the alternate relay installed, you know the relay is the problem and should be replaced.

- Remove the relay and set up your meter - Using the repair manual for your vehicle, to determine which relay terminal is controlled by the switch. Most relay switches will be found inside the steering wheel. This will require opening the steering wheel by accessing the two screws on the left and right sides of the steering wheel.

Warning: The horn switch is usually part of the steering wheel pad. In modern vehicles, this means it is part of the airbag system. Improper service of the airbag system can result in accidental airbag deployment and/or damage to the airbag system. So, if you suspect a faulty horn switch, it is advisable to have the repair performed by a professional. - Test the horn switch - If there is no power at the horn switch, then the button will no longer respond when the button is pressed.
- Test the relay switch - Remove the relay and set your digital multimeter to the Ohms setting. Touch one meter lead to the switch relay socket and the other to the battery negative post. Have another person push the horn button to test the reading.
Tip: You should see a numeric reading on the screen indicating continuity. A continuous reading displaying “Out of Limits (OL)” means that the switch is not closing and needs to be replaced.

- Test the horn - You can find the horns of a car on the radiator core or right behind the car’s grille.

- Determine which wire is power and which is ground - Using the factory repair manual for your vehicle, determine which wire is power and which is ground.
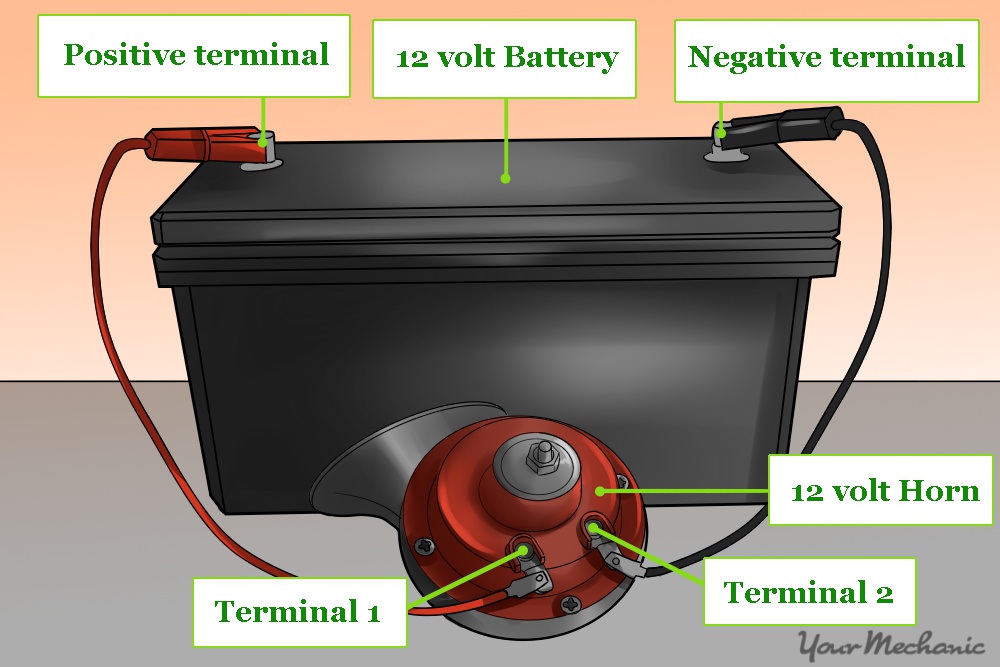
- Jump the horn - Remove the horn connector and attach a jumper lead between the battery’s positive post and the (+) terminal on the horn. Then, connect the other jumper wire between the negative battery post and the (-) terminal on the horn. The horn should now sound. If it does not, the horn is faulty and should be replaced.
- Test the circuit - If your horn still does not work after you have tried all of the methods above and replaced all faulty components, then the last thing that you can check is the horn’s circuit.

- Check the wiring - If everything checks out to this point, but the horn still does not work, you’ll want to check the circuit wiring. Test the ground side of the circuit and the power side for current and voltage in the steps below.
- Test the ground side of the circuit - According to your car’s manual, identify the ground side of the circuit. To check for ground, set the meter to the Ohms setting. Then touch one meter lead to the horn connector (-) pin and the other to the ground. You should see a numeric reading displayed on the meter lead if this is working properly.
Tip: A reading of “Out of Limits” (OL) means there is no current to the horn ground. In this case, a professional will need to access the factory wiring diagram to trace the cause. - Test the power side of the circuit - According to your car’s manual, identify the power side of the circuit. Check for power by setting your meter to the volts setting. Touch one meter lead to the horn connector (+) pin and the other to ground. Your meter should display battery voltage.
Toyota Corolla - Fuse Panel
Checking and replacing fuses
If any of the electrical components do not operate, a fuse may have blown. If this happens, check and replace the fuses as necessary.
Step 1 - Vehicles with smart key system: Turn the “ENGINE START STOP” switch OFF.
Srep 2 - Vehicles without smart key system: Turn the engine switch OFF.
Open the fuse box cover.
Driver’s side instrument panel - Remove the instrument panel
Under the driver’s side instrument panel - Remove the lid

Under the driver’s side instrument panel


If any of the electrical components do not operate, a fuse may have blown. If this happens, check and replace the fuses as necessary.
Step 1 - Vehicles with smart key system: Turn the “ENGINE START STOP” switch OFF.
Srep 2 - Vehicles without smart key system: Turn the engine switch OFF.
Open the fuse box cover.
Driver’s side instrument panel - Remove the instrument panel
Under the driver’s side instrument panel - Remove the lid
Under the driver’s side instrument panel

THEREFORE XXX BASIC CAR
Tidak ada komentar:
Posting Komentar